Micro Swiss Bowden Extruder Installation Instructions
SKU Part Number:
M2714

Reverse polarity cable
2M3 x 6mm Flat Head Socket Cap Screws
3Tooltips provide additional information upon hover or focus
4Tooltips provide additional information upon hover or focus
5Tooltips provide additional information upon hover or focus
6Tooltips provide additional information upon hover or focus
7Tooltips provide additional information upon hover or focus
8Tooltips provide additional information upon hover or focus
9Tooltips provide additional information upon hover or focus
10Tooltips provide additional information upon hover or focus
11Tooltips provide additional information upon hover or focus
12Tooltips provide additional information upon hover or focus
13Tooltips provide additional information upon hover or focus
14Tooltips provide additional information upon hover or focus
15Tooltips provide additional information upon hover or focus
16Tooltips provide additional information upon hover or focus
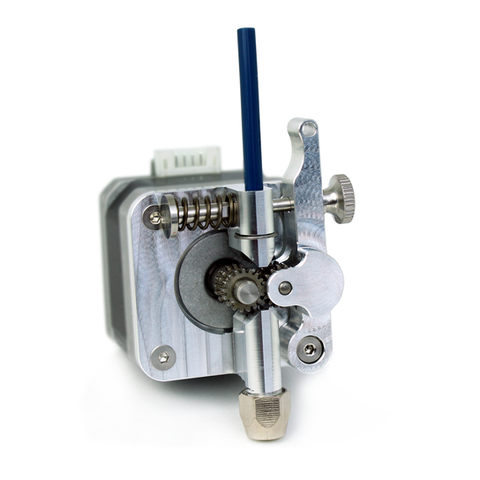
1 - Reverse polarity cable
2 - M3 x 8mm Motor Mounting Screws (3)
3 - Capricorn Liner
4 - Spring Pin
5 - Spring
6 - Knob
7 - Main Extruder body
8 - E-Clip Retaining Ring
9 - Motor Gear
10 - Extruder Lever with gear
11 - Printed Extruder Knob
12 - Brass compression sleeve
13 - 1.5mm Allen wrench
14 - Shoulder Pin
15 - Compression nut
16 - Brass compression sleeve (spare)

- Sharp knife
- 2.5mm Allen wrench
- 2.0mm Allen wrench
- 1.5mm Allen wrench (included)
- 10mm wrench
Preparation
Verify that your extruder gear is removable. (held on by set screws). If your gear is pressed on, the motor will need to be replaced. We recommend the Creality 42-40 stepper motor.
If you have a filament runout sensor or any other custom components, verify the fitment of the new extruder. Some printers will need to have the filament runout sensors moved to a 3D printed bracket.
Printable Filament Runout Sensor Bracket Download Links:
Remove the filament spool from the printer and allow the printer to cool down.
Step 1 - Safety
For your safety, turn off and unplug the printer.
Make sure the hotend is at room temperature before working on the printer.
Step 2 - Remove original extruder


Disconnect the stepper motor cable from the motor.
Remove the Bowden tube from the extruder by pressing the grey plastic lip towards the extruder and then pulling on the Bowden tube out.
Unscrew the tensioning bolt and then remove the spring.
Unscrew the lever bolt, and remove the lever handle.
Unscrew the three remaining bolts and remove the stepper motor and original extruder body.
Step 3 - Remove the original gear


Unscrew the two set screws holding the gear and remove the gear.
Note: If your gear is not held on with set screws, this means you have a pressed-on gear. In that case, the motor will need to be replaced because motors with pressed-on gears do not have the required D-cut shaft for the Micro Swiss gear.
Step 4 - Install the Main Extruder Body and stepper motor


Use the three M3 x 8mm screws to attach the new extruder body to the stepper motor.
The threaded side of the extruder's filament path should be directed towards the hotend.
Position the stepper motor so that the connector is facing the rear.
Step 5 - Install the lever arm and motor gear


Attach the Extruder Lever with Gear using the Shoulder Pin bolt.
Install the Motor Gear, placing the set-screw on the flat side of the stepper motor shaft.
Align the gears and tighten the set screw using a 1.5mm Allen wrench.
Step 6 - Install the tensioning spring


Place the spring on the spring pin bolt and then insert it through the main body and lever.
Screw the compression nut onto the spring pin. Tighten it until the end of the bolt is flush with the compression nut.
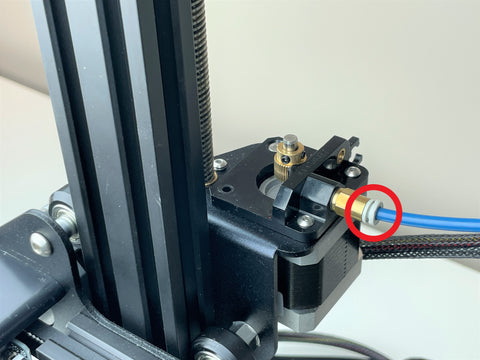
Step 7 - Bevel the end of the Bowden tube.


Place the end of the Bowden tube on a flat surface, and use a sharp knife to cut bevels on the end, making a 90 degree peak.
Step 8 - Connect the Bowden tube


Place the compression nut onto the Bowden tube.
Place the brass compression sleeve onto the Bowden tube.
Insert Bowden tube into extruder, aligning the beveled end with the gears.
Tighten the compression nut using a 10mm wrench, while holding the Bowden tube in position.
The compression nut needs to be snug.
Over-tightening can constrict the filament path.
Tug on the PTFE tube to verify it is secured in position.
Step 9 - Connect the cable


Connect the short stepper motor cable included with the kit.
The cable's purpose is to change the direction in which the stepper motor rotates.
Step 10 - Slicer Settings
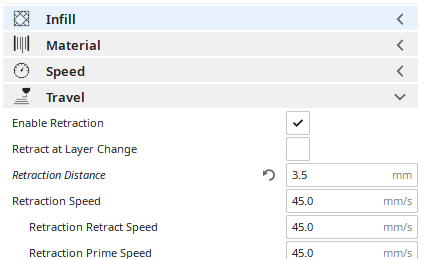
Adjust the Retraction Distance in your slicer.
When paired with an All Metal Hotend set the Retraction Distance to about 3.5mm. (4.0mm maximum)
With a stock PTFE lined hotend, set the Retraction Distance to about 5.0mm
Step 11 - Adjust printer settings
Set the Extruder steps/mm to 130.
Download the MS_DD_ESTEPS.gcode and then print it on your printer as you would with any other GCode that you've sliced yourself. The GCode file sets the Esteps to 130 and saves the setting.
Step 12 - Final Inspection

Inspect the gears, verifying they are aligned with each other. If one of the gears is lower than the other, loosen the set screw and adjust.
Tug on the Bowden tube to make sure it is locked securely in place. If it moves, readjust it and tighten the 10mm compression nut more.
Install the extruder knob by aligning the flat part of the D-cut motor shaft with the flat part of the extruder knob orifice.
Rotate the extruder knob and verify they gears mesh together and revolve smoothly.
The installation is now complete!
Tips
Filament Change
To insert filament, just push the filament in and rotate the knob. Do not pull the lever when loading new filament.
To remove filament, either rotate the knob, or pull the lever back and pull the filament out.
Calibration
The Extruder steps/mm (Esteps) need to be calibrated, 130 is a good starting point.
Fine tune the Flow Rate / Extrusion Multiplier in your slicer. Some filaments expand when heated and require the flow rate to be reduced to get good results.